最近在亚马逊EC2云主机上搭建了CTF网站,你可以通过域名来访问ctf.hackbiji.top,站点预计留存至2024年底,期间随时可以来体验体验,目前已经吸引很多大佬来刷题了,非常感谢大家的陪伴,期待刷完的那一天,一起加油哟,冲呀~

ailx10
网络安全优秀回答者
网络安全硕士
去咨询
1、01 mp4隐写
使用ffmpeg 将mp4文件逐帧提取
ffmpeg.exe -i wars.mp4 -r 1 -f image2 %d.jpg
得到每一帧

运行脚本,逐帧叠加图片
 from glob import globimport ospath = "*.jpg"file = " ".join(glob(path))command = "convert {} -background none -compose lighten -flatten output.jpg".format(file)print(command)os.system(command)
删除前后的干扰图片,再运行脚本,直接扫出flag
2、02 虚拟硬盘隐写
打开DiskGenius-》工具-》打开分区镜像以便提取文件,或者DiskGenius-》分区-》从镜像文件恢复分区,都没有成功,最终在 DiskGenius-》磁盘-》打开虚拟磁盘文件,成功看到mp4文件
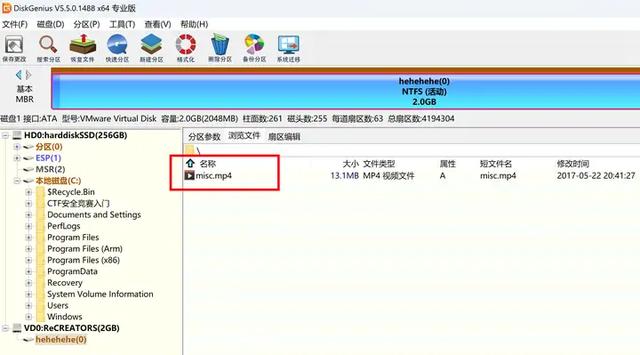
可以欣赏misc.mp4

01:29
使用 binwalk 可以看到隐写了一个word文档

使用 foremost 提取文件

使用wps打开

编写python脚本,将上述word内容复制进hex_raw,解码得到flag
 import base64hex_raw = "344...034393344"def get_hex_string(hex_raw): bytes_list = [int(hex_raw[i:i+2], 16) for i in range(0, len(hex_raw), 2)] # 将字节列表转换为 ASCII 字符串 ascii_string = ''.join([chr(byte) for byte in bytes_list]) return ascii_stringdef decoded_32_string(encoded_string): # 解码 base32 decoded_bytes = base64.b32decode(encoded_string) # 将 bytes 对象转换为字符串 decoded_string = decoded_bytes.decode('utf-8') return decoded_stringdef decoded_64_string(encoded_string): # 解码 base64 decoded_bytes = base64.b64decode(encoded_string) # 将 bytes 对象转换为字符串 decoded_string = decoded_bytes.decode('utf-8') return decoded_stringif __name__ == "__main__": hex_string = get_hex_string(hex_raw) hex_string = get_hex_string(hex_string) decoded_string = decoded_32_string(hex_string) decoded_string = decoded_32_string(decoded_string) decoded_string = decoded_32_string(decoded_string) decoded_string = decoded_64_string(decoded_string) decoded_string = decoded_64_string(decoded_string) hex_string = get_hex_string(decoded_string) decoded_string = decoded_32_string(hex_string) decoded_string = decoded_64_string(decoded_string) decoded_string = decoded_64_string(decoded_string) print(decoded_string)
3、03 pyc隐写01
使用stegsolve打开,点击左键,就能看到这样的图像,扫一扫二维码,就能拿到flag,其中stegsolve 可由下面的命令安装
wget http://www.caesum.com/handbook/Stegsolve.jar -O stegsolve.jarchmod +x stegsolve.jarjava -jar stegsolve.jar使用二维码识别工具,得到如下提示:03F3开头,是pyc文件标识

使用winhex写入1.txt文件中,然后对1.txt重命名为1.pyc

使用在线工具直接反编译,也可以使用命令uncompyle6 1.pyc > 1.py

运行python脚本,即可得到flag
4、04 pyc隐写02
这题又遇到pyc文件了,之所以上一题用在线环境,是因为mac m1系统没有低版本的python环境,而在线环境必须30分钟,才能反编译1个文件,因此,还是决定装一个低版本的python
conda create -n py36conda activate py36conda config --env --set subdir osx-64conda install python=3.6pip install uncompyle6 -i https://mirrors.aliyun.com/pypi/simple/ --trusted-host mirrors.aliyun.comuncompyle6 test.cpython-36-stegosaurus.pyc > 2.py这里得到python文件,直接运行,打印了144,144,显然不是flag

可能是pyc文件嵌入了Payload,需要上工具 Stegosaurus,注意不能 pip install 。
Stegosaurus [1]仅支持 Python3.6 及其以下版本,在mac m1下一顿操作,直接拿到flag。
git clone https://github.com/AngelKitty/stegosaurus.gitcd stegosauruscp ../test.cpython-36-stegosaurus.pyc .python -m stegosaurus test.cpython-36-stegosaurus.pyc -x 参考^stegosaurus https://github.com/AngelKitty/stegosaurus
发布于 2024-01-03 14:17・IP 属地美国