一、引言
针对 Diffusion 模型的条件控制,除了最常用的文本 Prompt,ControlNet 是个不错的方法,ControlNet 可以输入一个 condition 图,condition 先经过几层卷积缩放到 latent 相同的大小,再与复制出来的 UNet 的 Zt 相加作为输入,最后把两个 UNet 的 Encoder 层加权相加,从而实现对生成结果的控制。由于 condition 只是卷积后直接加到Zt,ControlNet 的控制效果主要是空间对齐,比如线条、边缘、姿态骨架等。
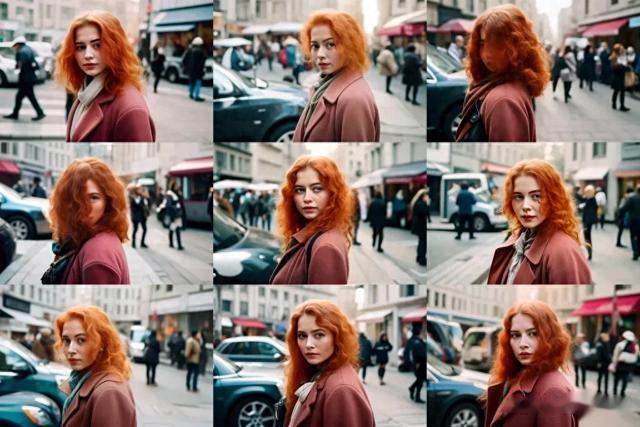
但有时候我们希望生成结果只是“参考” condition 图,不需要空间对齐,甚至不能空间对齐。比如,我们希望生成同一个人的不同动作,只需要人物主体保持一致,或者生成一些动画,帧与帧都是“参考”同一个输入图的:
针对这类问题,本文要介绍的 ReferenceNet 是一种典型算法,其最早可以追溯到 ControlNet 的作者在 sd-webui ControlNet 插件(https://github.com/Mikubill/sd-webui-controlnet) 里的实现,包括 Reference-Only、Reference-AdaIN 两种形式:
https://github.com/Mikubill/sd-webui-controlnet/discussions/1236https://github.com/Mikubill/sd-webui-controlnet/discussions/1280后来有多篇 Paper 都采用了类似方法,用于视频生成、换装、换脸等,今天先来看下 ReferenceNet 的原理。
二、ReferenceNet
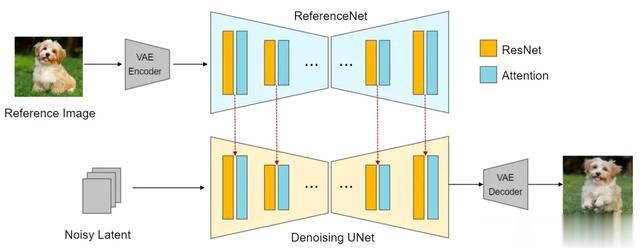
如上图是 ReferenceNet 的基本结构,其在标准 Diffusion UNet 去噪过程中新增了一个 UNet(ReferenceNet),参考图经过 VAE encode 后作为 ReferenceNet 的输入,然后把两个 UNet 各层"关联"起来(图中红线所示),从而实现对参考图的 "Reference",注意这里形式上是两个 UNet,实际上也可以用同一个 UNet 实现,即 Denoising 循环中每一步先走上半部分的 Reference 过程,把需要“关联”的中间数据存起来,再走下半部分常规的 Denoising 过程,所以 ControlNet 作者在帖子里说这种 Control 方式不需要额外的模型:
Now we have a reference-only preprocessor that does not require any control models. It can guide the diffusion directly using images as references.
两个 UNet 各层具体的关联方式,作者提出了两种:Reference-Only 和 Reference-AdaIN
Reference-Only
这种关联方式相对简单,就是把两个 UNet 的 Self-Attention 输入拼接在一起,再作为 Denoising UNet 的 Self-Attention 输入,如下图的红线所示:

来看具体的代码实现,以 huggingface diffusers 中的实现为例:https://github.com/huggingface/diffusers/blob/main/examples/community/stable_diffusion_reference.py
首先代码中定义了 read、write 两种模式:
write: Reference UNet 将需要关联的中间数据存起来(比如存到 self.bank)read: Denoising UNet 从 bank 中读取关联数据,并进行处理然后是 Reference-Only 的 write 实现:
if MODE == "write": self.bank.append(norm_hidden_states.detach().clone()) attn_output = self.attn1( norm_hidden_states, encoder_hidden_states=encoder_hidden_states if self.only_cross_attention else None, attention_mask=attention_mask, **cross_attention_kwargs, )可以看到只做了一件事,就是把 norm_hidden_states 存到 self.bank 中,然后继续走原来的 Self-Attention 流程。再来看 read 的实现:
if MODE == "read": if attention_auto_machine_weight > self.attn_weight: attn_output_uc = self.attn1( norm_hidden_states, encoder_hidden_states=torch.cat([norm_hidden_states] + self.bank, dim=1), # attention_mask=attention_mask, **cross_attention_kwargs, ) attn_output_c = attn_output_uc.clone() if do_classifier_free_guidance and style_fidelity > 0: attn_output_c[uc_mask] = self.attn1( norm_hidden_states[uc_mask], encoder_hidden_states=norm_hidden_states[uc_mask], **cross_attention_kwargs, ) attn_output = style_fidelity * attn_output_c + (1.0 - style_fidelity) * attn_output_uc self.bank.clear() else: attn_output = self.attn1( norm_hidden_states, encoder_hidden_states=encoder_hidden_states if self.only_cross_attention else None, attention_mask=attention_mask, **cross_attention_kwargs, )变量 attention_auto_machine_weight 用来控制权重,其中 attn_weight 是各层从 0 到 1 的一个系数,也就是说 attention_auto_machine_weight 控制有多少层参与 Reference 的计算,默认 1.0 即所有层都参与
for i, module in enumerate(attn_modules): module._original_inner_forward = module.forward module.forward = hacked_basic_transformer_inner_forward.__get__(module, BasicTransformerBlock) module.bank = [] module.attn_weight = float(i) / float(len(attn_modules))read 实现里最关键的就是这句:
encoder_hidden_states=torch.cat([norm_hidden_states] + self.bank, dim=1)用于把两个 UNet 的 norm_hidden_states 拼接起来,作为 Self—Attention 的输入,后面的 style_fidelity 则是用来做 CFG 权重控制。
Reference-AdaIN
AdaIN (Adaptive Instance Normalization) 是 2017 年发表的一种用于风格迁移的算法:(https://arxiv.org/abs/1703.06868)

如上图所示,AdaIN 可以简单理解为在做网络层 Normalization 的时候,使用参考图的均值、方差作为 Norm 系数,从而实现风格迁移,应用到 ReferenceNet,也是一样对每层的输出进行交换系数 Norm,首先是 write 过程:
x = self.original_forward(*args, **kwargs)if MODE == "write": if gn_auto_machine_weight >= self.gn_weight: var, mean = torch.var_mean(x, dim=(2, 3), keepdim=True, correction=0) self.mean_bank.append(mean) self.var_bank.append(var)先调用 original_forward 得到输出 x,然后计算 x 的均值方差,分别存到 self.mean_bank 和 self.var_bank,与 Reference-Only 类似,gn_auto_machine_weight 用来做权重控制。接下来是 read 过程:
if MODE == "read": if len(self.mean_bank) > 0 and len(self.var_bank) > 0: var, mean = torch.var_mean(x, dim=(2, 3), keepdim=True, correction=0) std = torch.maximum(var, torch.zeros_like(var) + eps) ** 0.5 mean_acc = sum(self.mean_bank) / float(len(self.mean_bank)) var_acc = sum(self.var_bank) / float(len(self.var_bank)) std_acc = torch.maximum(var_acc, torch.zeros_like(var_acc) + eps) ** 0.5 x_uc = (((x - mean) / std) * std_acc) + mean_acc x_c = x_uc.clone() if do_classifier_free_guidance and style_fidelity > 0: x_c[uc_mask] = x[uc_mask] x = style_fidelity * x_c + (1.0 - style_fidelity) * x_uc self.mean_bank = [] self.var_bank = []其中 mean_acc、std_acc 分别是根据 mean_bank、var_bank 计算出来的 Reference 层的累积均值、方差,用作当前层 Norm 的系数。同样的,style_fidelity 用来做 CFG 权重控制。
三、相关算法介绍
借鉴 ReferenceNet 的算法目前已经挺多了,大部分都有一些改动,比如修改具体的“关联”方式,又或者增加一些 Control 逻辑等,这里挑一些进行简单介绍。
1. Animate Anyone: Consistent and Controllable Image-to-Video Synthesis for Character Animation
Paper:https://arxiv.org/abs/2311.17117
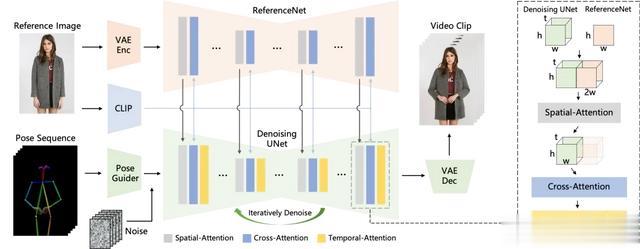
基于一张人像参考图,生成带动作的视频,ReferenceNet 本身没啥改动,用的最基本的 Self-Attention 输入拼接的方式,由于要生成连贯的视频,Denoising UNet 中添加了 Temporal-Attention(类似于 AnimateDiff),用于帧间关联,另外动作的控制 Pose Guider 采用和 ControlNet 一样的做法,实现人物姿势和输入姿态图的空间对齐。
2. MagicAnimate: Temporally Consistent Human Image Animation using Diffusion Model
Paper:https://arxiv.org/abs/2311.16498Code:https://github.com/magic-research/magic-animate
也是基于人像参考图生成带动作的视频,Appearance Encoder 其实就是 ReferenceNet,动作控制采用了独立的 ControlNet,同样为了视频帧间连贯性,Denoising UNet 中添加了 Temporal-Attention。
3. EMO: Emote Portrait Alive – Generating Expressive Portrait Videos with Audio2Video Diffusion Model under Weak Conditions
Paper:https://arxiv.org/abs/2402.17485

语音驱动的人像视频生成,同样也是 ReferenceNet + Denoising UNet,不过 Denoising UNet 中 Attention 把原始的用于 Prompt 控制的 Cross-Attention 换成了 Reference-Attention + Audio-Attention,另外也加了 Temporal-Attention 用于增强帧间一致性,Face Region 经过 MLP 加到输入上,和 ControlNet 类似,用于控制头部位置,另外为了动作的稳定性,还加了 head Speed 的输入,并嵌入到 Temporal-Attention。
4. AniPortrait: Audio-Driven Synthesis of Photorealistic Portrait Animation
Paper:https://arxiv.org/abs/2403.17694Code:https://github.com/Zejun-Yang/AniPortrait
也是语音驱动的人像视频生成,这里驱动的方式和 EMO 不一样,包括两个流程:Audio2Lmk 将语音+人像生成人脸姿态序列,Lmk2Video 再把人像+姿态序列生成视频帧,只看 Lmk2Video 部分就是个标准的 ReferenceNet + ControlNet 流程了,当然这里也加了 Temporal-Attention。
5. MagicPose: Realistic Human Poses and Facial Expressions Retargeting with Identity-aware Diffusion
Paper:https://arxiv.org/abs/2311.12052Code:https://github.com/Boese0601/MagicDance
也叫 MagicDance,姿态图+人像生成动作视频,结构上没什么特别,ReferenceNet + ControlNet + Temporal-Attention,特点就是这里 ReferenceNet 和 Denoising UNet 的关联采用了 交换 Self-Attention QKV 的方式。
6. Hallo: Hierarchical Audio-Driven Visual Synthesis for Portrait Image Animation
Paper:https://arxiv.org/abs/2406.08801Code:https://github.com/fudan-generative-vision/hallo
语音驱动的人像视频生成,主体结构采用 ReferenceNet + Denoising UNet,两个 UNet 的 Cross-Attention 输入由之前的 Prompt embedding 改成参考图经过 Face Encoder 得到的 features,同样该模型也加了 Temporal-Attention。
7. Improving Diffusion Models for Virtual Try-on
Paper:https://arxiv.org/abs/2403.05139
Code:https://github.com/yisol/IDM-VTON

虚拟试装,结构上可以看作 ReferenceNet + ControlNet + IP-Adapter,ReferenceNet 用的最基本的 Attention 输入拼接方式,ControlNet 输入由要替换的衣服的 mask、人物背景、人体姿态多通道合并一起,按文章的说法,ReferenceNet 主要控制衣服图片的 low-level 特征,而 IP-Adapter 则是控制 high-level 的语义特征。
8. StableGarment: Garment-Centric Generation via Stable Diffusion
Paper:https://arxiv.org/pdf/2403.10783Code:https://github.com/logn-2024/StableGarment
也是虚拟试装,结构上采用 ReferenceNet + ControlNet,ReferenceNet 的关联方式改成了 "Addictive Self-Attention",即 Self-Attention 输出相加。ControlNet 的输入与上一篇文章类似。
9. From Parts to Whole: A Unified Reference Framework for Controllable Human Image Generation
Paper:https://arxiv.org/pdf/2404.15267Code:https://github.com/huanngzh/Parts2Whole
比前面的虚拟试装更通用,可以输入多个参考图(+mask),最后组合成完整的人像照片,结构上可看作 ReferenceNet + ControlNet + IP-Adapter,ReferenceNet 支持了 mask,即 write 流程里对 norm_hidden_states 进行了 mask 处理:
masked_norm_hidden_states = ( norm_hidden_states * augmented_resized_hidden_states_mask )self.bank.append(masked_norm_hidden_states.clone())参考图除了经过 VAE 作为 ReferenceNet 的输入,还经过 CLIP 提取特征,输入到 Decoupled Cross-Attention,也就是 和 IP-Adapter 一样的处理方式,用于增强语义特征。
10. FlashFace: Human Image Personalization with High-fidelity Identity Preservation
Paper:https://arxiv.org/abs/2403.17008Code:https://github.com/ali-vilab/FlashFace
支持多参考图输入的保 ID 人像生成,结构上可以看作 ReferenceNet + ControlNet,ReferenceNet 的关联方式采用 Self-Attention 输出相加,ControlNet 的输入则是人脸框mask。
11.DiffPortrait3D: Controllable Diffusion for Zero-Shot Portrait View Synthesis
Paper:https://arxiv.org/abs/2312.13016Code:https://github.com/FreedomGu/DiffPortrait3D/
人像多视角合成,结构上可以看作 ReferenceNet + ControlNet,ReferenceNet 采用 Attention 拼接的方式,ControlNet 输入的是View相机的姿态参数,与视频生成类似,这里加了 View-Consistency Module 用于提升视角之间的一致性。
作者:无悬
来源-微信公众号:LitGate
出处:https://mp.weixin.qq.com/s/MzRy6BoCoimbQJtcZeuZsA
